Hello all,
I have two 'parts' tractors that are the starting point for my next project(s). The 147 is nearly all there, a complete basket case, everything seized. The 122 runs, but in very rough shape.
I've had the idea of creating model 142 by putting repaired powertrain (minus engine) from the 122 onto the 147 chassis & rebuilt engine. I figure that since they're both narrow frames, it is not an unreasonable proposition...? Any warnings about this idea before it gets started?
The tonneau of the 147 will need some holes to accommodate the creeper handle & what appears to be a breather outlet from the 122. A new 147 wiring harness should do the trick. Cannot see/think of other major obstacles, based on my very limited experience.
Thank-you in advance for your feedback,
122/147 hybrid project
-
PTWannaHave
- Posts: 295
- Joined: Wed Apr 11, 2012 12:39 pm
- First and Last Name: Ben Michaud
- Location: Richmond, Ontario
122/147 hybrid project
PTWannaHave
-
Dave C
- Web Developer
- Posts: 1014
- Joined: Mon Sep 06, 2010 7:12 am
- First and Last Name: David Chester
- Location: Wallingford, CT
Re: 122/147 hybrid project
Sounds like your really trying to create a "146" basically a 147 but with a gear drive... which would make it a "6"
a 142 would sorta be created by droping a 14 hp into a 122 chassis thus creating a 142
I dont see any issues doing that... aside from the lack of holes for the creeper... which i never even noticed they were omited from that frame.
other then that the transmissions all have the same bolt up pattern... i took a 123 trans and inserted it into my 882.... with no mods whatsoever.
dave
Trying to save cubs... one at a time.......
-
jroy
- Posts: 4
- Joined: Mon Oct 03, 2011 1:13 pm
- First and Last Name: Josh Roy
- Location: Colchester, CT
Re: 122/147 hybrid project
I did what you're trying to do with my 147, except with out a creeper, for one of my pulling tractors. Easy bolt on swap minus the fact that my 147 had been sitting for 25 years before I did the swap.
-
vince_o

- Moderator
- Posts: 2045
- Joined: Mon Sep 06, 2010 3:20 am
- First and Last Name: Vince Ochiuto
- Location: Pickens, SC
Re: 122/147 hybrid project
Josh, are you trying to say it was just a bit rusty? 
"It's a damn poor mind that can only think of one way to spell a word."
-Andrew Jackson
-Andrew Jackson
-
PTWannaHave
- Posts: 295
- Joined: Wed Apr 11, 2012 12:39 pm
- First and Last Name: Ben Michaud
- Location: Richmond, Ontario
Re: 122/147 hybrid project
I see what you mean about a '146' Dave... Good point. If I keep the newer fender style on the chassis, I would probably baptize '146'. If I end putting the older style fenders (not sure if they'll bolt onto a 147 frame) , I'll be tempted to baptize it a '142'.Dave C wrote:Sounds like your really trying to create a "146" basically a 147 but with a gear drive... which would make it a "6"
a 142 would sorta be created by droping a 14 hp into a 122 chassis thus creating a 142.
[snip]
dave
Should be an interesting project and learning experience. It'll take me awhile, especially since I have never rebuilt an engine or clutch. When I get stuck, more experienced forum members will probably be of great help.
Cheers,
PTWannaHave
-
ksanders
- Posts: 930
- Joined: Mon Sep 06, 2010 2:56 pm
- First and Last Name: Kevin Sanders
- Location: Sellersburg, Indiana
Re: 122/147 hybrid project
Engines and clutches are both pretty straight forward but there are a lot of mistakes that can be made that cause you to tear back into it, especially the motor. Ask me how I know  On the clutch, just make sure the spring is good, bearing is free and quiet, and check for any wear on the driveshaft or places that take shear pins. Probably ought to check the clutch disc and turn the clutch plates down while you're at it. As for the motor, have the Kohler service manual and check all of the clearances on everything you can while in there to avoid going back in. Don't forget to throw a governor gear in there while you're at it.
From the first Original to the last x82 Series... you can't beat an IH Cub Cadet!!!
-
Tim DeLooza

- Posts: 148
- Joined: Mon Sep 06, 2010 6:57 am
- First and Last Name: Tim DeLooza
- Location: Penn Yan, NY
Re: 122/147 hybrid project
Ben, It’s going to depend on what sheet metal your gong to use on the 147 frame. The tunnel on the 147 frame will be short if you’re going to use the 122 fenders. They will bolt on, but the tunnel wont go all the way to the seat support. Also if you use the 122 fenders the “tabs” on the frame for the 147 foot rests will need to be removed so you can use the 122 foot rests.
-
Racenitro

- Posts: 354
- Joined: Tue Sep 07, 2010 10:31 pm
- First and Last Name: Frank S. Morski
- Location: O'Fallon, Il
Re: 122/147 hybrid project
I had a nearly identical project 80% complete before I ran out of time. I was mating a 126 and a 147. Used the 147 frame and engine, the 126 rear and creeper.
Here are some of the things I experienced.
The pedestal will need to be changed or a bracket added for the clutch fork.
You will not be able to add the hudraulic side unit as the kick out is in the way.
If you have a creeeper, you will need to make the slot.
The break/clutch pedal will need to be removed rom the 122 and put ont he 147
You can use an electric lift if you don't want maual lift.
The frame bolts up with no problems
Drive shaft on mine was not a problem. Don't know about a non creeper combination.
Somebody bought mine but I can't remember which way it went and am ot sure if the new owner ever finished it.
-
PTWannaHave
- Posts: 295
- Joined: Wed Apr 11, 2012 12:39 pm
- First and Last Name: Ben Michaud
- Location: Richmond, Ontario
Re: 122/147 hybrid project
Thanks for all the useful feedback! 
Currently, I am leaning towards putting 122 parts on the 147 engine & frame only. (There are no plans to mow with this tractor; it would be used for 'bull work'.)
Since I don't like how narrow frame tonneaus/tunnels are not removable, I plan to cut them out and make them bolt-on in future projects. Therefore, I could consider putting the 122 tunnel onto the 147 frame... Sounds like using the 122 console (with no fiberglass dash) will also be the way to go.
Anyhow, all this will come only after I've got a rebuilt 14hp engine working; which might take me awhile due to inexperience & finances.
PTWannaHave
-
jroy
- Posts: 4
- Joined: Mon Oct 03, 2011 1:13 pm
- First and Last Name: Josh Roy
- Location: Colchester, CT
Re: 122/147 hybrid project
To say the least! In hind sight I should have taken the 14hp from the 147 and cut the frame of my parts tractor to fit it. Problems I ran into include but not limited to: rotted dash pedestal, corroded wiring harness, fenders dented/pitted beyond repair, hood cut and washers welded in where it bolts to the grill, busted steering column, rear cross member broken with piece missing, front axle pivot previously broken and very poorly repaired, etc. I kept finding and repairing things as I went a long and after a while it came to a point where I just have too much time into it to go back now. As it sits now the only things original to the tractor are the engine, frame, rear wheels and tires, and the steering wheel.vince_o wrote:Josh, are you trying to say it was just a bit rusty?
But to stay on topic the 122 sheet metal will swap over you will just need to do a little cutting and drilling. The foot rests and fender/seat supports bolt up differently. What I would do is look over both tractors very thoroughly, decide which one is a better starting point and go from there. Cutting and welding the frame of the 122 wouldn't be that difficult and in my case it would have been the easier route.
-
PTWannaHave
- Posts: 295
- Joined: Wed Apr 11, 2012 12:39 pm
- First and Last Name: Ben Michaud
- Location: Richmond, Ontario
Re: 122/147 hybrid project
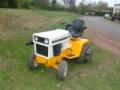
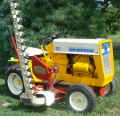
- Donors, side-by-side
- 122 donor
- 147 donor
PTWannaHave
-
PTWannaHave
- Posts: 295
- Joined: Wed Apr 11, 2012 12:39 pm
- First and Last Name: Ben Michaud
- Location: Richmond, Ontario
Re: 122/147 hybrid project
Well... I finally have something to show...  (We did do a major house reno in 2013...)
As you can see, this will be pretty much an all-white tractor. The rear tires are ATV tires I got at a better price than tractor ag tires. I splurged on the front tri-rib. (I can't say enough about the extraordinary service from M.E. Miller Tire...)
Notice the lack of a tonneau on the frame... I have made it removable.
The engine (pics in a future post) has a grey block and parts that bolt onto the block are yellow. The engine is complete minus carb, head and ignition.
Got a basic clutch from MSC; mine is so far gone...
I currently plan to paint the hood and fenders a mix of white and yellow. (More white than yellow.) Hoping to fabricate round fenders out of trailer fenders.
Thanks again to Dave C. for transmission parts (another post) and more recently Mike Lamar for a custom harness! Thanks to forum contributors for my education!
Cheers,
As you can see, this will be pretty much an all-white tractor. The rear tires are ATV tires I got at a better price than tractor ag tires. I splurged on the front tri-rib. (I can't say enough about the extraordinary service from M.E. Miller Tire...)
Notice the lack of a tonneau on the frame... I have made it removable.
The engine (pics in a future post) has a grey block and parts that bolt onto the block are yellow. The engine is complete minus carb, head and ignition.
Got a basic clutch from MSC; mine is so far gone...
I currently plan to paint the hood and fenders a mix of white and yellow. (More white than yellow.) Hoping to fabricate round fenders out of trailer fenders.
Thanks again to Dave C. for transmission parts (another post) and more recently Mike Lamar for a custom harness! Thanks to forum contributors for my education!
- New boots; 122 tranny on 147 frame
- IMGP4841.JPG (1.06 MiB) Viewed 11749 times
- rear view; another cover plate will be used...
- IMGP4842.JPG (1.05 MiB) Viewed 11749 times
PTWannaHave
-
Ben Morong
- Posts: 139
- Joined: Thu Sep 09, 2010 7:04 am
- First and Last Name: Ben Morong
- Location: Southern ME
Re: 122/147 hybrid project
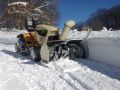
ATV tires and trailer fenders
- Attachments
-
- 100_1669.jpg (85.39 KiB) Viewed 11727 times
-
- 100_1671.jpg (94.7 KiB) Viewed 11727 times
-
- 100_1672.jpg (87.04 KiB) Viewed 11727 times
Cub Cadet Originals -- Ayuh! (and a couple of 124's, 125's, and a 1650 -- Yep!)
-
PTWannaHave
- Posts: 295
- Joined: Wed Apr 11, 2012 12:39 pm
- First and Last Name: Ben Michaud
- Location: Richmond, Ontario
Re: 122/147 hybrid project
Looks fantastic!
Was it tricky to figure out the piece of sheet metal that is welded to the fender and connects to the seat support? Any tips or things learned when performing that particular fabrication? (I can't see a good look of the fender connecting to the footrest, but I assume it's there.)
I currently have 31" fenders, but could also obtain 32". What are yours? (I guess it really won't make that much of a difference.)
Thanks,
PTWannaHave
-
PTWannaHave
- Posts: 295
- Joined: Wed Apr 11, 2012 12:39 pm
- First and Last Name: Ben Michaud
- Location: Richmond, Ontario
Re: 122/147 hybrid project
- test-fitting clutch assembly
- IMGP4847.JPG (1.06 MiB) Viewed 11678 times
Also, why does that heavy bracket that holds the clutch arm have two holes to choose from for bolting to the pedestal?
Thank-you in advance,
PTWannaHave
-
JMotuzick
- Moderator
- Posts: 1175
- Joined: Tue Sep 07, 2010 6:22 pm
- First and Last Name: Joe Motuzick
- Location: Torrington Ct
Re: 122/147 hybrid project
That is a custom arm and the person who made it was not square with his holes! I'm also guessing that the second set it a goof!
-
PTWannaHave
- Posts: 295
- Joined: Wed Apr 11, 2012 12:39 pm
- First and Last Name: Ben Michaud
- Location: Richmond, Ontario
Re: 122/147 hybrid project
Well, wadaya know...?! A p.o. modification...
I don't have access to a gear drive narrow-frame machine to look at how things are supposed to be... Could someone pls. post a pic or two of how things are supposed to be? My (now powder-coated) pedestal does not have anything to receive the yoke that the clutch lever hangs off of... (I was also left wondering how the clutch shield was supposed to fit with that heavy bar.)
I am (unfortunately) seeing some outsourced fabrication work in the future. (One day, I hope to have the equipment... I now have a shop and limited time.)
Thank-you in advance,
PTWannaHave
-
Dave C
- Web Developer
- Posts: 1014
- Joined: Mon Sep 06, 2010 7:12 am
- First and Last Name: David Chester
- Location: Wallingford, CT
Re: 122/147 hybrid project
Well aint that just a pisser! the worst thing to have a part all done and painted any find out its been modified.... i have been there
- Attachments
-
- IMG_20150114_174742188.jpg (2.1 MiB) Viewed 11643 times
Trying to save cubs... one at a time.......
-
Jlaws
- Posts: 1141
- Joined: Sun Sep 05, 2010 10:14 pm
- First and Last Name: Jess Laws
- Location: Independence , Ky
Re: 122/147 hybrid project
Ben , I've seen that type of bracket before on narrow frames . The factory mount is wimpy and tends to flex and eventually crack rendering the clutch pretty much inoperable . I've got a identical bracket on my 122 when the factory one cracked .
Guys into pulling that use a stiffer pulling clutch spring use a beefed up bracket similar to yours .
Guys into pulling that use a stiffer pulling clutch spring use a beefed up bracket similar to yours .
I see a lot of cub cadets while going down the tracks , its a shame I can't pull over and ask about them .
-
PTWannaHave
- Posts: 295
- Joined: Wed Apr 11, 2012 12:39 pm
- First and Last Name: Ben Michaud
- Location: Richmond, Ontario
Re: 122/147 hybrid project
Thanks for the pic Dave, and thanks for the observation, Jess.
I'm noticing that in Dave's pic, that would locate the yoke a fair bit higher than in my pic...
Well, I guess I will have to:
- fit the clutch with the engine, and see if by luck the clutch arm will line up with that heavy-duty bracket (unlikely), OR
- fab a new bracket of at least 1/8" thick steel, fit the clutch with the engine, and then mark the holes for the yoke on the fabricated piece.
I'll try to find some 1/4" thick steel scrap... I'll use the same method/premise as what I already have.
Thanks for the help,
PTWannaHave
-
Jlaws
- Posts: 1141
- Joined: Sun Sep 05, 2010 10:14 pm
- First and Last Name: Jess Laws
- Location: Independence , Ky
Re: 122/147 hybrid project
Ben , This may be a stupid question , but did you try flipping that bracket over ? Looking at the two pictures , yours and the one Dave provided it looks like your bracket might be upside down ?
I see a lot of cub cadets while going down the tracks , its a shame I can't pull over and ask about them .
-
dag1450

- Posts: 2375
- Joined: Fri Apr 01, 2011 3:16 pm
- First and Last Name: Dave Gibson
- Location: Chalfont, Pa
Re: 122/147 hybrid project
Thanks Jess....i was wondering the same thing, but did not want to ask. Oh Ben by the way......the WHITE looks "sick".....as in good!! Dave
127, 1650, 1572, 1872, 2072 . A mower, blower and blade for each.
-
Tom Scott
- Chief Moderator
- Posts: 1776
- Joined: Mon Sep 06, 2010 9:11 pm
- First and Last Name: Tom Scott
- Location: Bentley Springs, Maryland
Re: 122/147 hybrid project
I think Jess nailed it! If you flip the heavy white bracket over, it looks like all the caddywhompus angles might just cancel out! If the angles do end up fine, does it then need another bolt at each side of the pedestal? Looks like it might be able to rotate with just one bolt at each end.
1872, 46", 50C decks, Haban dozer blade, 450 snow blower
2182-1, Kwik-Way Loader, 3-pt & rear pto, 442 tiller
2182-2, 54" deck, 551 snow blower
Past tractors: 1541, 2135
<><
2182-1, Kwik-Way Loader, 3-pt & rear pto, 442 tiller
2182-2, 54" deck, 551 snow blower
Past tractors: 1541, 2135
<><
-
PTWannaHave
- Posts: 295
- Joined: Wed Apr 11, 2012 12:39 pm
- First and Last Name: Ben Michaud
- Location: Richmond, Ontario
Re: 122/147 hybrid project
Thanks for the tip guys; it's on my to-do list to play around with that bracket some more, but with the engine in and the clutch assembly held at both ends of the shaft. I'll then see if one of the four possible positions of that bracket (it has a pair of mounting holes on each side) will work. The position you see in the pic was my best guess at eyeballing the alignment without the engine, and how I remember it was mounted. (Both could be incorrect!)
In any case, it's good to know that it is not factory, but not an uncommon owner 'upgrade'. I'll keep you posted,
In any case, it's good to know that it is not factory, but not an uncommon owner 'upgrade'. I'll keep you posted,
PTWannaHave
-
PTWannaHave
- Posts: 295
- Joined: Wed Apr 11, 2012 12:39 pm
- First and Last Name: Ben Michaud
- Location: Richmond, Ontario
Re: 122/147 hybrid project
- new hour meter & location
- IMGP4855.JPG (1.08 MiB) Viewed 11570 times
- clutch aligned with engine
- IMGP4853.JPG (1.08 MiB) Viewed 11570 times
What allows this work is that there is a lot of play/room in the lever that engages the throw-out bearing... So, all is well. I'm not sure why I was looking at clutch alignment right now anyway; that can almost come in last; I should concentrate on getting the engine running... Lots of work to be done before that can happen; it'll be awhile before that happens, I think...
Ciao,
PTWannaHave
-
PTWannaHave
- Posts: 295
- Joined: Wed Apr 11, 2012 12:39 pm
- First and Last Name: Ben Michaud
- Location: Richmond, Ontario
Re: 122/147 hybrid project
I proceeded to finish installing the clutch completely, to make sure there would be no issues. (It's easy enough to remove at this point if it gets in the way.) Well, I ran into a glitch:
When I fitted the clutch without securing the (rear) shaft collar (but with the engine bolted in), everything was good. The kevlar disc was not centered on the pins (front to back), but definitely acceptable.
When I came to secure the stock shaft collar (with shoulder bolts as opposed to spring roll pins), I needed 3/16" of extra space: the creeper shaft and clutch shaft were butted up against one another, but the distance between the two holes in the shafts was greater than the distance between the holes of the collar (by 3/16").
I proceeded to shave the rear of the clutch shaft length by 3/16", and my collar now fits. (That may not have been the best solution, in hindsight, but still unsure what would've been the best solution.) As you can see in the pics below, this results in the kevlar disc now sitting dangerously close to the edge of the pins.
So, how to remedy the latter...? I have thought of 3-4 different solutions. My 1st inclination is to add a 1/4" spacer between the driving plate and engine (and use 1/4" longer bolts to secure the driving plate). There is 9/32" of free space to put a spacer and move the driving plate towards the clutch disc.
Looking forward to the direction of the wise and experienced,
When I fitted the clutch without securing the (rear) shaft collar (but with the engine bolted in), everything was good. The kevlar disc was not centered on the pins (front to back), but definitely acceptable.
When I came to secure the stock shaft collar (with shoulder bolts as opposed to spring roll pins), I needed 3/16" of extra space: the creeper shaft and clutch shaft were butted up against one another, but the distance between the two holes in the shafts was greater than the distance between the holes of the collar (by 3/16").
I proceeded to shave the rear of the clutch shaft length by 3/16", and my collar now fits. (That may not have been the best solution, in hindsight, but still unsure what would've been the best solution.) As you can see in the pics below, this results in the kevlar disc now sitting dangerously close to the edge of the pins.
- IMGP4861.JPG (1.03 MiB) Viewed 11538 times
- IMGP4862.JPG (1.07 MiB) Viewed 11538 times
Looking forward to the direction of the wise and experienced,
PTWannaHave
-
PTWannaHave
- Posts: 295
- Joined: Wed Apr 11, 2012 12:39 pm
- First and Last Name: Ben Michaud
- Location: Richmond, Ontario
Re: 122/147 hybrid project
OK, well, it seems that Jan. & Feb. of every year are my best months to make progress on my Cub project(s)... (I guess I need the other 10 months to work and save $$  )
)
So, picking up from where I last left this thread, I resolved the spacing issue with two large 1.5"ID washers (that were more like 1 5/8"). Two of them gave me about 3/8" thickness (I was looking for 1/4").
As you will notice, the clutch Kevlar disc sits nicely on the pins, but the pins are now only 1/16" of an inch away from the (black) clutch bracket! So, perhaps one washer would've sufficed, but I will try like that. It's quite a pain to install the engine & clutch in this not-designed-for-clutch engine/frame combo. You cannot use the documented method of dropping the engine on the frame and sliding it towards the clutch to mate the two components... This next picture shows how I managed to assemble, very slowly, moving every part 1/4" at a time, fitting everything together sorta simultaneously:
(The pics have been rotated & saved properly on my computer, but they always revert back to original orientation when I upload to this forum...??!!)
A few more pics of other progress:
{Continuing in next post for additional pictures...}
So, picking up from where I last left this thread, I resolved the spacing issue with two large 1.5"ID washers (that were more like 1 5/8"). Two of them gave me about 3/8" thickness (I was looking for 1/4").
- Clutch drive plate with spacers
- IMGP5143.JPG (663.79 KiB) Viewed 11461 times
- Clutch install into 147 frame with 14hp
- IMGP5135.JPG (684.67 KiB) Viewed 11461 times
A few more pics of other progress:
- drive shaft collar with shoulder bolts
- IMGP5144.JPG (502.76 KiB) Viewed 11461 times
- Custom clutch shield
- IMGP5150.JPG (665.26 KiB) Viewed 11461 times
- S/G with customised pulley to accept B belt
- IMGP5151.JPG (669.31 KiB) Viewed 11461 times
PTWannaHave
-
PTWannaHave
- Posts: 295
- Joined: Wed Apr 11, 2012 12:39 pm
- First and Last Name: Ben Michaud
- Location: Richmond, Ontario
Re: 122/147 hybrid project
- Heavy engine front pulley
- IMGP5152.JPG (667.03 KiB) Viewed 11460 times
- Rubberized weather stripping under gas tank
- IMGP5153.JPG (684.46 KiB) Viewed 11460 times
- fuel shutoff with filter
- IMGP5154.JPG (660.93 KiB) Viewed 11460 times
So, my carb has been rebuilt (may not work; was VERY rough), and I think the next step is seeing if this engine will run? Is the voltage regulator required? (I.e.: Can I wait to hook it and the lights up; leaving that end of the wiring harness unattached?) Thank-you in advance,
PTWannaHave
-
JMotuzick
- Moderator
- Posts: 1175
- Joined: Tue Sep 07, 2010 6:22 pm
- First and Last Name: Joe Motuzick
- Location: Torrington Ct
Re: 122/147 hybrid project
That shut off was used in the 8/9 series. You can take off the nipple and the union and thread the shut off directly into the tank.
If you put 12v to the coil it will run. If you plan on using the harness the grey wire will be hot as soon as the battery is hooked up!
If you put 12v to the coil it will run. If you plan on using the harness the grey wire will be hot as soon as the battery is hooked up!
-
davis2
- Posts: 254
- Joined: Tue Jan 12, 2016 10:30 pm
- First and Last Name: Dave Davis
- Location: Quantico,MD (Formerly from Lee Center,NY)
Re: 122/147 hybrid project
Ben, how are those ATV tires in the snow? For mowing?Ben Morong wrote:ATV tires and trailer fenders