Hydro linkage
-
chzuck

- Posts: 364
- Joined: Tue Sep 07, 2010 2:51 pm
- First and Last Name: Charlie Zuck
- Location: Elizabethtown, PA
Hydro linkage
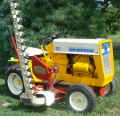
Anyone ever replace the pin in the linkage in the diagram? Mine is worn half way through on the one side.
- Attachments
-
- linkage.JPG (42.47 KiB) Viewed 9059 times
http://www.zucksrototillers.com
There is only ONE ROTOTILLER.
147 with 48" mower deck & 42" QA snow thrower
70 with 42" mower deck, 42" blade, & Brinly 10" plow
There is only ONE ROTOTILLER.
147 with 48" mower deck & 42" QA snow thrower
70 with 42" mower deck, 42" blade, & Brinly 10" plow
-
dag1450

- Posts: 2365
- Joined: Fri Apr 01, 2011 3:16 pm
- First and Last Name: Dave Gibson
- Location: Chalfont, Pa
Re: Hydro linkage
No....what tractor is this on? Is it hard to get to...or is the pin hard to get? You r asking us for a reason....lol. Tell us some more......
127, 1650, 1572, 1872, 2072 . A mower, blower and blade for each.
-
ksanders
- Posts: 930
- Joined: Mon Sep 06, 2010 2:56 pm
- First and Last Name: Kevin Sanders
- Location: Sellersburg, Indiana
Re: Hydro linkage
I think you have to take the snap ring off the hydro linkage to get that off. The rear end needs to come loose I think but if you take the rear fenders off and get the snap ring off you might slide it loose enough to get that piece out. That big plate is called the swash plate or something, can't remember.
Isn't that part just the hydro return linkage so it goes to neutral when pushing the clutch pedal in? If so the only important part would be making sure it isn't catching.
Isn't that part just the hydro return linkage so it goes to neutral when pushing the clutch pedal in? If so the only important part would be making sure it isn't catching.
From the first Original to the last x82 Series... you can't beat an IH Cub Cadet!!!
-
chzuck
- Posts: 364
- Joined: Tue Sep 07, 2010 2:51 pm
- First and Last Name: Charlie Zuck
- Location: Elizabethtown, PA
Re: Hydro linkage
It is off my 147. Looks like it could be a 5/16" dowel pin pressed into the rod. Mainly wanted to know if anyone replaced the pin and if there were any problems.dag1450 wrote:No....what tractor is this on? Is it hard to get to...or is the pin hard to get? You r asking us for a reason....lol. Tell us some more......
http://www.zucksrototillers.com
There is only ONE ROTOTILLER.
147 with 48" mower deck & 42" QA snow thrower
70 with 42" mower deck, 42" blade, & Brinly 10" plow
There is only ONE ROTOTILLER.
147 with 48" mower deck & 42" QA snow thrower
70 with 42" mower deck, 42" blade, & Brinly 10" plow
-
chzuck
- Posts: 364
- Joined: Tue Sep 07, 2010 2:51 pm
- First and Last Name: Charlie Zuck
- Location: Elizabethtown, PA
Re: Hydro linkage
I have the rear removed to replace the hydro gasket and while inspecting for other possible problems I saw that the pin was worn half way through on the one side. I was asking about replacing the pin.ksanders wrote:I think you have to take the snap ring off the hydro linkage to get that off. The rear end needs to come loose I think but if you take the rear fenders off and get the snap ring off you might slide it loose enough to get that piece out. That big plate is called the swash plate or something, can't remember.
Isn't that part just the hydro return linkage so it goes to neutral when pushing the clutch pedal in? If so the only important part would be making sure it isn't catching.
http://www.zucksrototillers.com
There is only ONE ROTOTILLER.
147 with 48" mower deck & 42" QA snow thrower
70 with 42" mower deck, 42" blade, & Brinly 10" plow
There is only ONE ROTOTILLER.
147 with 48" mower deck & 42" QA snow thrower
70 with 42" mower deck, 42" blade, & Brinly 10" plow
-
dag1450
- Posts: 2365
- Joined: Fri Apr 01, 2011 3:16 pm
- First and Last Name: Dave Gibson
- Location: Chalfont, Pa
Re: Hydro linkage
Ok....no I was never up in my 127 that far. Mine could very well be in the same condition....lol. Are pins still available though Cub? If not....hit Rays place. Have u been over to his new shop...its very nice. This might b a good excuse to go over. He would also b able to tell u best way to replace. Good luck and let us know.
127, 1650, 1572, 1872, 2072 . A mower, blower and blade for each.
-
Tom Scott
- Chief Moderator
- Posts: 1772
- Joined: Mon Sep 06, 2010 9:11 pm
- First and Last Name: Tom Scott
- Location: Bentley Springs, Maryland
Re: Hydro linkage
Charlie, I suspect that is made just like the rods on the 82 Series & Cyclops I am familiar with. (dag, that pin is pressed into the rod end from the factory, not a separate Cub part).
Interestingly enough, the entire rod (with pin of course) is still available from Cub, but is big money (IH-528870-R2, $96.25). I would think the pin would press out pretty easily with any hydraulic press and possibly with your vice (if no press available) using a socket to "catch" pin.
For a replacement pin, that should be hardened material. The easiest source would be the non-threaded portion of a hardened bolt (Grade 5 or Grade 8). The Grade 8 will be the hardest and therefore the hardest to cut. I would probably go for the Grade 5 with the idea that I would rather the pin wear quicker than the part it rubs against, and Grade 5 is still plenty hard. You will likely need to use a cut-off wheel on a grinder to cut it, very hard to get through with a hacksaw.
1872, 46", 50C decks, Haban dozer blade, 450 snow blower
2182-1, Kwik-Way Loader, 3-pt & rear pto, 442 tiller
2182-2, 54" deck, 551 snow blower
Past tractors: 1541, 2135
<><
2182-1, Kwik-Way Loader, 3-pt & rear pto, 442 tiller
2182-2, 54" deck, 551 snow blower
Past tractors: 1541, 2135
<><
-
dag1450
- Posts: 2365
- Joined: Fri Apr 01, 2011 3:16 pm
- First and Last Name: Dave Gibson
- Location: Chalfont, Pa
Re: Hydro linkage
Ok...it's Christmas! ... cutoff wheels...grinders and hacksaws seem like a lot of work!
Charlie...get in your car with a friend....drive to Ray's.... stop for lunch and have fun with the trip! U can even stop at paul-Bs if u need some supplies for future projects
Sorry Tom....mine sounds better....
Charlie...get in your car with a friend....drive to Ray's.... stop for lunch and have fun with the trip! U can even stop at paul-Bs if u need some supplies for future projects
Sorry Tom....mine sounds better....
127, 1650, 1572, 1872, 2072 . A mower, blower and blade for each.
-
chzuck
- Posts: 364
- Joined: Tue Sep 07, 2010 2:51 pm
- First and Last Name: Charlie Zuck
- Location: Elizabethtown, PA
Re: Hydro linkage
I have been to his new and old place many times and have kept 3 cubs running with his help. This was just something I thought I could repair and save the trip. I removed the pin. It is a 5/16" X 3/4" piece of round stock and it was either silver soldered in the hole or some kind of welding process. At this point I am going to check with my close neighbor who has a collection of Cub parts although not near as much as Ray.dag1450 wrote:Ok....no I was never up in my 127 that far. Mine could very well be in the same condition....lol. Are pins still available though Cub? If not....hit Rays place. Have u been over to his new shop...its very nice. This might b a good excuse to go over. He would also b able to tell u best way to replace. Good luck and let us know.
http://www.zucksrototillers.com
There is only ONE ROTOTILLER.
147 with 48" mower deck & 42" QA snow thrower
70 with 42" mower deck, 42" blade, & Brinly 10" plow
There is only ONE ROTOTILLER.
147 with 48" mower deck & 42" QA snow thrower
70 with 42" mower deck, 42" blade, & Brinly 10" plow
-
chzuck
- Posts: 364
- Joined: Tue Sep 07, 2010 2:51 pm
- First and Last Name: Charlie Zuck
- Location: Elizabethtown, PA
Re: Hydro linkage
Surprisingly the pin is not hard like a dowel pin. It mushroomed rather quickly when I hammered it out. It was either held in place with silver solder or some kind of welding process. The part of the pin that was in the link was copper colored. As I said, at this point I will check with my neighbor for a used one before I go further. A grade 5 bolt would be better material than a plain piece of round stock.Tom Scott wrote: For a replacement pin, that should be hardened material. The easiest source would be the non-threaded portion of a hardened bolt (Grade 5 or Grade 8). The Grade 8 will be the hardest and therefore the hardest to cut. I would probably go for the Grade 5 with the idea that I would rather the pin wear quicker than the part it rubs against, and Grade 5 is still plenty hard. You will likely need to use a cut-off wheel on a grinder to cut it, very hard to get through with a hacksaw.
http://www.zucksrototillers.com
There is only ONE ROTOTILLER.
147 with 48" mower deck & 42" QA snow thrower
70 with 42" mower deck, 42" blade, & Brinly 10" plow
There is only ONE ROTOTILLER.
147 with 48" mower deck & 42" QA snow thrower
70 with 42" mower deck, 42" blade, & Brinly 10" plow
-
Tom Scott
- Chief Moderator
- Posts: 1772
- Joined: Mon Sep 06, 2010 9:11 pm
- First and Last Name: Tom Scott
- Location: Bentley Springs, Maryland
Re: Hydro linkage
Charlie - If the existing was not hardened, then a piece of generic round stock or Grade 2 bolt material is perfect. Look how long that stock one lasted! Like I said, I would rather an easily replaceable pin wear than what it is bearing against. Sounds like soldering back in is probably a good way to go.
As for visiting Ray with a buddy and getting lunch... Always a good time! And if not familiar, Paul B. is a fabulous hardware store in Ray's area. I think Paul B. has more good stuff in one place than I have ever seen!
As for visiting Ray with a buddy and getting lunch... Always a good time! And if not familiar, Paul B. is a fabulous hardware store in Ray's area. I think Paul B. has more good stuff in one place than I have ever seen!
1872, 46", 50C decks, Haban dozer blade, 450 snow blower
2182-1, Kwik-Way Loader, 3-pt & rear pto, 442 tiller
2182-2, 54" deck, 551 snow blower
Past tractors: 1541, 2135
<><
2182-1, Kwik-Way Loader, 3-pt & rear pto, 442 tiller
2182-2, 54" deck, 551 snow blower
Past tractors: 1541, 2135
<><
-
chzuck
- Posts: 364
- Joined: Tue Sep 07, 2010 2:51 pm
- First and Last Name: Charlie Zuck
- Location: Elizabethtown, PA
Re: Hydro linkage
Right, easy to replace parts need to be the expendable ones. Just imagine Cub has been serving well for 47 years. I am willing to bet many of today's Cubs will never see that.
http://www.zucksrototillers.com
There is only ONE ROTOTILLER.
147 with 48" mower deck & 42" QA snow thrower
70 with 42" mower deck, 42" blade, & Brinly 10" plow
There is only ONE ROTOTILLER.
147 with 48" mower deck & 42" QA snow thrower
70 with 42" mower deck, 42" blade, & Brinly 10" plow
-
SWilliams

- Posts: 806
- Joined: Mon Sep 06, 2010 7:14 pm
- First and Last Name: Steve Williams
- Location: Fort Plain NY (Upstate NY near Cooperstown)
Re: Hydro linkage
Copper colored = furnace brazed. Most likely the end where the pin goes is hot forged and punched for the hole, which leaves a hole with a slight taper from the punch. Then a dab of brazing flux and insert the pin, heat to flow the braze and done. Fast and easy.
Same thing in a home shop - take flux covered brazing rod and file the rod into powder, Add some extra brazing rod from filing bare rod. Use a ream or drill to open the taper a bit. install pin, pack braze powder around it, heat with torch to flow.
Same thing in a home shop - take flux covered brazing rod and file the rod into powder, Add some extra brazing rod from filing bare rod. Use a ream or drill to open the taper a bit. install pin, pack braze powder around it, heat with torch to flow.
Owner of an 1863, 2263 (1863 W 22hp engine!) 2084 and a 2 - 2284s.
"In God we trust, All others pay CASH..."
"In God we trust, All others pay CASH..."
-
Tom Scott
- Chief Moderator
- Posts: 1772
- Joined: Mon Sep 06, 2010 9:11 pm
- First and Last Name: Tom Scott
- Location: Bentley Springs, Maryland
Re: Hydro linkage
Hey, Merry Christmas everyone!!
Steve's idea is the first class, gold plated method. That being said, I would clean well, put a drop of Loctite bearing & sleeve retainer on it, press together and roll on!
If that didn't work, then I'd be brazing!
Steve's idea is the first class, gold plated method. That being said, I would clean well, put a drop of Loctite bearing & sleeve retainer on it, press together and roll on!
If that didn't work, then I'd be brazing!
1872, 46", 50C decks, Haban dozer blade, 450 snow blower
2182-1, Kwik-Way Loader, 3-pt & rear pto, 442 tiller
2182-2, 54" deck, 551 snow blower
Past tractors: 1541, 2135
<><
2182-1, Kwik-Way Loader, 3-pt & rear pto, 442 tiller
2182-2, 54" deck, 551 snow blower
Past tractors: 1541, 2135
<><
-
chzuck
- Posts: 364
- Joined: Tue Sep 07, 2010 2:51 pm
- First and Last Name: Charlie Zuck
- Location: Elizabethtown, PA
Re: Hydro linkage
Tom and Steve, both great ideas! Thanks.
http://www.zucksrototillers.com
There is only ONE ROTOTILLER.
147 with 48" mower deck & 42" QA snow thrower
70 with 42" mower deck, 42" blade, & Brinly 10" plow
There is only ONE ROTOTILLER.
147 with 48" mower deck & 42" QA snow thrower
70 with 42" mower deck, 42" blade, & Brinly 10" plow
-
chzuck
- Posts: 364
- Joined: Tue Sep 07, 2010 2:51 pm
- First and Last Name: Charlie Zuck
- Location: Elizabethtown, PA
Re: Hydro linkage
Well the 147 is finally back together. I had that pin brazed to the linkage. I did the famous trunion repair, hydro gasket, and drive shaft mod. Unfortunately I did not take a photo of the repair job on the trunion, but it turned out well.
- IMG_2739 (Medium).JPG (127.47 KiB) Viewed 8951 times
- IMG_2758 (Medium).JPG (198.02 KiB) Viewed 8951 times
http://www.zucksrototillers.com
There is only ONE ROTOTILLER.
147 with 48" mower deck & 42" QA snow thrower
70 with 42" mower deck, 42" blade, & Brinly 10" plow
There is only ONE ROTOTILLER.
147 with 48" mower deck & 42" QA snow thrower
70 with 42" mower deck, 42" blade, & Brinly 10" plow
-
dag1450
- Posts: 2365
- Joined: Fri Apr 01, 2011 3:16 pm
- First and Last Name: Dave Gibson
- Location: Chalfont, Pa
Re: Hydro linkage
Good! How did u choose to repair trunion? Weld up the defects? Weld new one on? Glue on a patch panel? Just wondering.
127, 1650, 1572, 1872, 2072 . A mower, blower and blade for each.
-
DaveKamp
- Posts: 555
- Joined: Mon Sep 06, 2010 10:19 am
- First and Last Name: Dave Kamp
- Location: LeClaire, Ia
Re: Hydro linkage
I came across this one kinda late, but the moment I saw the first image, I knew it was the 'cam' pin. The cam pin on Loader-Mutt is worn sloppy too, as is the bushing that the trunion pivots on... and when those are all loosey-goosey, ot exhibits some grumpy behaviour at times.
I've touched up a few of those (and plenty of trunions) I would have just added a little MIG wire to the pin and then ground it roundish with the 4" grinder and a flap disk... or if the pin was really, really, really bad just cut the pin end off and welded a new piece of round stock in it's place, but my shop is equipped with more options than most guys'.
Chuck- I've seen some worn out trunion holes... yours is about as far as they can wear, without falling apart. Lucky you caught it when you did!
Yes, I'm a Mad Scientist... but I'm usually happy, even when things ain't goin right.
-
chzuck
- Posts: 364
- Joined: Tue Sep 07, 2010 2:51 pm
- First and Last Name: Charlie Zuck
- Location: Elizabethtown, PA
Re: Hydro linkage
Dave Kamp, If I knew the grief that pin would cause I would have put some weld on it and ground down as you said. I thought that pin was pressed into the rod and it would be a simple job just to replace it. After a couple of blows with a hammer the end taking the beating mushroomed. I did however see it had started to move. I only discovered later that that pin is installed and then silver soldered or brazed. I could see a copper colored residue on the pin and the hole in the linkage. When I was working as a millwright our shop had all those neat tools to properly repair something like that. Alas I do not have a torch or I would have installed that pin and silver soldered it. I did a lot of that on all kinds of repair items when I was working. I took it to a local weld shop and had it brazed. I learned that the owner of the shop is the only one who does brazing. Seems that is becoming a lost art. A co-worker has a little fab shop at his house and I thought he could do the brazing but he said he never did any of that. I was concerned that welding a new one in place would leave too much metal around the pin and interfere with it sliding in its track.
As for the hydro slot, I have done 3 of these now. Arc welded all of them. I did consider purchasing the slot, cutting the old one off, and welding the new one on but decided to go ahead and repair mine. I used a piece of copper to back up the worn slot so I would not melt those very fragile corners. Spites me I forgot to take a photo of the finished job. I also add a flat washer under the spring on each end to make the hydro more responsive. It helps the hydro from slowing down as much going up hill. It is slightly more jerky when moving the lever, but to me the added responsiveness is worth it.
As for the hydro slot, I have done 3 of these now. Arc welded all of them. I did consider purchasing the slot, cutting the old one off, and welding the new one on but decided to go ahead and repair mine. I used a piece of copper to back up the worn slot so I would not melt those very fragile corners. Spites me I forgot to take a photo of the finished job. I also add a flat washer under the spring on each end to make the hydro more responsive. It helps the hydro from slowing down as much going up hill. It is slightly more jerky when moving the lever, but to me the added responsiveness is worth it.
http://www.zucksrototillers.com
There is only ONE ROTOTILLER.
147 with 48" mower deck & 42" QA snow thrower
70 with 42" mower deck, 42" blade, & Brinly 10" plow
There is only ONE ROTOTILLER.
147 with 48" mower deck & 42" QA snow thrower
70 with 42" mower deck, 42" blade, & Brinly 10" plow
-
DaveKamp
- Posts: 555
- Joined: Mon Sep 06, 2010 10:19 am
- First and Last Name: Dave Kamp
- Location: LeClaire, Ia
Re: Hydro linkage
Aside from adhesives and mechanical fasteners (bolts, screws, rivets)...
Brazing the SECOND method of securing two metals together that I believe a person should learn.
The first, is soldering copper wires.
Reason for SECOND, is that once you've soldered a pair of 16awg stranded copper wires together with 60/40 rosin core, moving to brazing is basically identical EXCEPT you're dealing with higher temperatures, steel, color change, and of course, substantially higher strength. I'd skip right over silver soldering, but there's plenty of places where silver soldering is the BEST choice, but it's really a 'specific' kind of scenario.
Purists frequently don't refer to soldering and brazing as 'welding' but they're techniques that we use for stickin' stuff together basically permanentishly, so I'll call it a 'flavor' of weldment.
I first learned brazing when I was oh... 15 or so. Had some cro-moly tubing cut and fitted into investment-cast lugs for a bicycle frame, and a friend (who was an accomplished metalsmith, but not a bicycle framebuilder) taught me how to flow brass, and that was the first steel bicycle frame I ever built. Even having never done it before, it turned out beautiful.
Henceforth, my 'workshop' consisted of a 225A Lincoln AC welder, a cutting torch kit with brazing head, a 4.5" grinder with cutoff wheels and grinding wheels (before flap-disks!)... and a tabletop drill press. I went a LONG way with those tools before I 'graduated' to sawzall, then abrasive chop saw, air hammer and cutoff, band saw, lathe, mill, bead blaster... (sigh)...
One of these days, when I get the new shop enclosed enough, and with a nice poured concrete floor, the CNC mill will finally get a good working home...
Yes, I'm a Mad Scientist... but I'm usually happy, even when things ain't goin right.
-
chzuck
- Posts: 364
- Joined: Tue Sep 07, 2010 2:51 pm
- First and Last Name: Charlie Zuck
- Location: Elizabethtown, PA
Re: Hydro linkage
Wow, what a shop! I have some of the things you mentioned, but not a torch. Would be nice to have a small one. We had one at work that I think was called a jeweler's torch. The bottles were only about 18" tall and just had a very small brazing torch and also had a torch tip for heating small round items. I used that a lot for small jobs the fellow employees brought it for repair. Since I retired I miss access to that stuff. I did get a table top drill press and a table for mounting a porta-band and just recently bought a sander with 4" belt and 6" circle. Got a compressor and built my own sand blast cabinet. With my hobby that blaster gets a lot of use.
http://www.zucksrototillers.com
There is only ONE ROTOTILLER.
147 with 48" mower deck & 42" QA snow thrower
70 with 42" mower deck, 42" blade, & Brinly 10" plow
There is only ONE ROTOTILLER.
147 with 48" mower deck & 42" QA snow thrower
70 with 42" mower deck, 42" blade, & Brinly 10" plow
-
DaveKamp
- Posts: 555
- Joined: Mon Sep 06, 2010 10:19 am
- First and Last Name: Dave Kamp
- Location: LeClaire, Ia
Re: Hydro linkage
Jewler's torch is just what the name says- it's a Jeweler's Torch!! Frequently they're just fuel gas, and fed oxygen via ambient air, but they can be combined oxy-gas, but they're tiny. They're the TIG welder of gas-torch systems- they get into small places, can generate high temps, but put it in precise spots so you don't melt down the whole works. If you're working on small, intricate stuff, it's the way to go.
If you need to knock a hole in a piece of 1" plate... it ain't...
But what you CAN do... you CAN easily cut a piece out of an old car roof, take a hard rubber mallet, couple pieces of pine wood, and a bag of sand, pound it into a round shape, and then use the JEWELER'S TORCH to either silver solder, brass, or just plain old puddle and weld it together into a nice aircraft-style fuel tank... or fix the torn crack in the fender of your 108 where that steel fencepost jumped up and snagged it back in ''97...
They're handy. When you need a jeweler's torch, the only other tool you can use in it's place, is another Jeweler's torch.
Surprisingly though, I don't own one.... Mebbie one'a these days I'll stumble upon one..
If you need to knock a hole in a piece of 1" plate... it ain't...
But what you CAN do... you CAN easily cut a piece out of an old car roof, take a hard rubber mallet, couple pieces of pine wood, and a bag of sand, pound it into a round shape, and then use the JEWELER'S TORCH to either silver solder, brass, or just plain old puddle and weld it together into a nice aircraft-style fuel tank... or fix the torn crack in the fender of your 108 where that steel fencepost jumped up and snagged it back in ''97...
They're handy. When you need a jeweler's torch, the only other tool you can use in it's place, is another Jeweler's torch.
Surprisingly though, I don't own one....
Yes, I'm a Mad Scientist... but I'm usually happy, even when things ain't goin right.